Showing posts with label DIY. Show all posts

11 September 2015

How to Make a Camera Bag - DIY


Hello all, today I am going to show you how I made a lovely camera bag out of a nice purse.  I wanted to have something to keep my camera safe, but not look like a big bag that was holding an expensive camera to steal.  Let's get started.


First, I took some foam seat cushions.  I kept toying with the idea of what to use, but it all seemed so expensive.  I got mine at Walmart.


I then measured the bag I had.  I had found this bag at a thrift store, and it was the perfect size. I knew that it would be a custom fit for the foam, so I measured it out.


I then cut the pieces to size and rough fit them in.  It was already coming together so great!  I was able to cut the bottom and the sides the same width, and then the shorter sides to squeeze in there.  So nice.


Then I took to the material.  I had this material laying around doing nothing.  It has odd bears of something on one side, but this super soft fuzziness on the other.  I really wanted none of my stuff to be damaged, so I decided to go against the grain and use the wrong side of the fabric for the outside.  I also cut it into a square with my rolling blade.  They make these for quilting, and I am not a quilter, but have no idea how I ever cut material straight before this.


I then of course sewed it up.  A few short stitches and we were in business.  I like square things....


Making sure it fit with the fabric on it.  It took a little working with it because the material had to be bigger to allow for the bending and the sitting on top of each other and such.  But, since I put the bottom and sides together, it makes it so the stuff doesn't fall outside of the cushioning.


I then took the two shorter sides and covered them, then sewed them on the edges.  You can really be a perfectionist here, or do as I did and leave room for wiggle.  It really makes no difference after you put it in the bag.  I also had a smaller piece for the middle as shown off the the side there.  Thought it would make a nice divider, but it quickly was tossed out because it just took up too much room.


Here it is, all nice and squished in there.  It looked so good once it was done and like nothing could hurt it.


I included a small notepad for keeping notes, a pen, some nylons for special effects for the camera, some extra batteries, my extra SD cards, and some other odds and ends that are always there when I need them.


To top it all off, my camera, in the bag I made for it.  (See instructions here).  It is a very nice bag, and always up for an adventure.


15 August 2014

DIY - Kettleball


I have decided I want to be healthier.  I try a bunch of random things, but most of my working out is at the gym.  I don't have $30 - $300 to throw away on equipment I won't use, I have enough of that already.  But, when I came across a way to make a kettleball, which is suppose to be super effective, I figured I'd give it a shot.  Mine cost me nothing because we already had all the supplies laying around the house, but I am told it isn't that much money to make yourself one.  (And yes, I did have a bag of concrete laying around with nothing to do.)


Step 1: Find someone nice and strong to help you.  Well, okay, maybe not, but it is more fun with someone else.  We took the PVC and put it in the oven on a diagonal and cut it to that length.  (Sorry, no pictures)

Step 2:  Cook the PVC.  Now, I still am not sure this is a good idea, afterall, they wouldn't let us use PVC on the lasercutter because it produced fumes that weren't healthy.  So my suggestion is to open a window so you don't die before improving your health by exercise.  I don't recall what the temperature was, something hot like you would bake a cake, and I think it was 10 minutes.  We were super skeptical of this step, but it worked very well.

Step 3: Bend it.  I put my hands on the tube with oven mitts on so we would know where to bend it so I could still grab it nicely.  I found it worked lovely with the padding so it isn't tight.  You then have to hold it while it cools.  This is really where you want two people because we kept switching who held it because it was getting our hands warm.


Step 4: Insert some screws.  Now, I know how concrete works, and it is lovely stuff.  However, when building walls, you need reinforcement in it, or else the wall may fall down.  I was afraid I'd be swinging this ball around and the ball would pop off of the handle.  So, to be sure we just popped some screws in the end to grip it.  It is also nice to have some nice guy to do this for you.  I can do power tools, the drill being one of the easy ones, but I still like my Father's help.  I actually use to do this in school too, go to the shop and act all like "oh no, big scary power tool...." looking all cute and helpless.  Yep, only had to use the tools half the time because the guys would help.  (Most of the time it was two cuts or three nails with the nailgun, I worked on the long projects myself.)  But guys like to help and play with the power tools, so I let them.


Anyways, here is the finished screws.


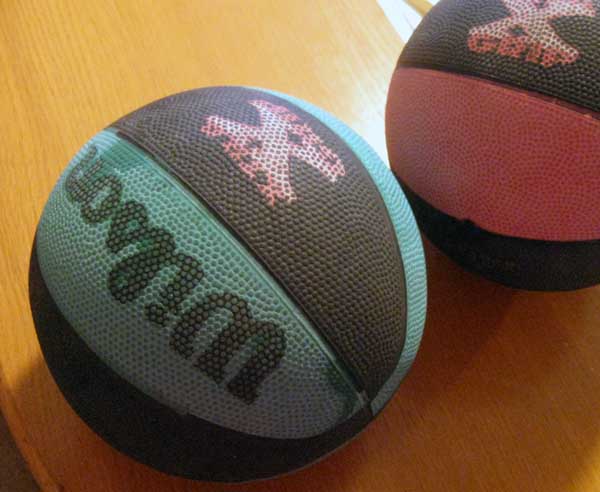
Step 5: Pick a ball.  I originally was going to make two, but didn't have enough concrete, or patience.  We have had these balls forever, they are the mini basketballs.  I loved them to death they were so fun, but they are so old that they will not bounce anymore and really should be thrown away.  Alas, perfect for a kettleball!


I happened to be lucky enough to pick the ball that was already flat and sunken in, makes it nice for standing up on the floor.


Step 6:  Cut holes.  Now, I've seen many versions of this.  I choose to combined them.  I have the holes for the PVC to go in, did some rough measuring, and kept putting it in to make sure the size was right.  I also have a slit down the middle because it was easy to get the concrete in that way.  I might have had some fun with this, started out with an exacto, yeah, didn't work well.  I mean, it was okay for the first few cuts, but...  I eventually just pulled out my, um, sheet metal cutters, and they worked great.  Why the sheet metal cutters?  Because they were the closest thing when I reached in the drawer.  Lots of power in them too.


Step 7: Concrete.  Mmmm... concrete...  I poured in what I thought I'd need, we ended up having to make a couple of batches, it was fun what can I say.


I really don't know what my obsession with concrete is, but once I added the water, it is just so playful.  It somehow gets to the consistency of tasty looking cake batter, and I just always want to eat it.  I mean, look at it, so pretty.  I made a video of it for you, and even though you may not be able to see it so well, it is so tasty looking.  (I might have a problem....)


Step 8: Put the concrete in the ball.  Easier said than done, once again, glad I had a friend to help.  We had fun and got concrete all over.  Lucky for us we emptied the bag so we had a surface, but I recommend some sort of protection for the floor.


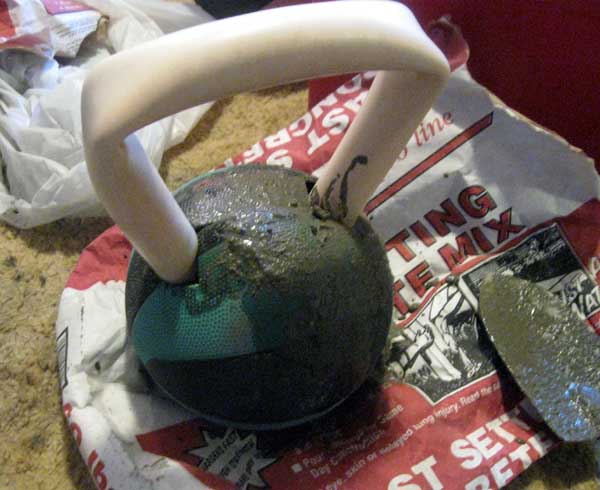
Step 9: Put the handle in, then let it dry.  Technically concrete takes 28 days to cure all the way, but it should be solid in this size after a nice nights rest.  It claimed to be 10 lbs, but I don't think mine is.  I wasn't able to fill it all up, ran out of concrete, but it works well anyways, I think it is about 8 lbs.  To make it heavier you could put in some heavy metal, but the only thing we could find was super heavy, and I didn't want it to be 50 lbs. 


Step 10: Finishing.  I whipped off the dried cement (and yes, it is cement because it is powdery stuff that goes inside concrete, but this was just hanging around on the outside.)  I also put a lot of the loose concrete bits inside the pocket of space for extra weight and fun noises when I swing it.  I then tapped it up real good so that it didn't come flying out at me.  I know what you are thinking, it isn't the prettiest thing in the world, and I will agree.  Some people spray paint theirs, but I felt I liked the raw feel of mine.

I hope you enjoyed this, I know I had too much fun making it.  Mine now sits on the floor in the basement, around where I work, and every time I go past it I try and pick it up and do a set of 10 - 15 Kettleball Swings.  I figure, it might help somehow.  Let me know if you make one of your own!

01 August 2014

How to clean shoes - real dirty shoes


 It is the two year anniversary of the time that I went on trek as a Ma.  Wow, times flys....  But, in remembrance, I thought I would share with you my dirty shoes and how I cleaned them.  If you don't know what trek is, it is a very spiritual experience that we participate in as youth in the LDS chruch.  I went when I was a kid, and loved it.  I went again, grown up, and loved it more.  We are placed in little families, I was a Ma and so was in charge a little family, along with my Pa.  We had seven kids, two 'aunts' and an 'uncle'.  I am still very close with a lot of them.  Oh, and before we went, I knew none of these people... well, most....  So, what do you do on trek?  Well, you wander around in the middle of nowhere for three days pulling a handcart.  Yep.  Our lovely trek plans got changed, last minute, like, as we got there, and so somehow ended up on the dustiest, sandiest path that there was.  We quit dusting out our cups because we were eating dirt as we walked anyways.  Needless to say, my shoes were not white when I came home like they were when I left.  I figured I would just toss the shoes, not worth the cleaning, but they were real comfortable, so I thought I would give it a go.  Here is my process, in case you have some shoes to be cleaned.

Step 1: Take a before picture, you'll want it


Step 2: Dry scrub
Now, I had an old toothbrush just waiting for cleaning, I typically have one.  But, any brush will do, just don't brush your teeth with it afterwards....


Step 3: Take out the laces
I had to get this close up, I mean, look, the white, that is what they were right before trek.  Now, I have to tell you, although they don't want you to take new shoes, my old shoes were getting too worn in, so I got new ones a week before and just wore them out a few times, trying to break in the walking.  So, they were new, and then a week in the middle of nowhere happened to them.


Step 4: Seriously, get rid of the laces
It helps, not only can the laces now be cleaned on their own, but it makes it so much easier to dry scrub the shoes.  Get all the dirt out from the outside and inside and everywhere you can.


Step 5: Be amazed at the dirt
Eww, right?  Don't worry, I ate more than that in a day.  Click on the picture to get a huge shot, so tasty.


Step 6: Put the laces in the wash
Now, I put my laces in a bag to get washed.  If not, they may get all wrapped around the washer, and that is not a good idea.  Mine got all tangled in the bag anyways.  I just had this handy bag with all my camping stuff, but a laudry bag would work well, or you know, something fabric.  


Step 7: Wash
I ran the water, I think on cold, on the small load.  It worked lovely.  Just run it.


Step 8: Admire the cleaness
Now, they came out a color I hadn't seen for a long, long time.  They never have quite recovered completely, but the tint to them reminds me of all the good times I had walking my 30+ miles in them.


Step 9: Air dry
Now, one of the keys to the whole washing in the washer, is actually the drying.  Do not put them in the dryer.  Instead, let them air dry, perferably outside.  I loaded up the inside with paper towels to soak up the inner water as well as help them keep their shape.  I don't recall how long I left them outside, but it was well into the night, so a good part of the day.


I hope this was educational, or at least entertaining.  I know I was clearly amazed that they could have such a dramatic improvement.  And like I said, they aren't perfect, but they have character.  I still am able to wear them, not much more than just going to the gym, but I do love them and was glad I could save them.

19 July 2014

How to make a Camera Bag Case


I am one that is fairly protective of my camera, and want it to live happily safe and sound.  I also do not like to spend money.  However, the biggest problem I run into is that I haven't found a camera case the size I wanted to fit my camera.  So, what is one to do?  Well make one of course!

(I would like to insert a disclaimer.  I love to sew, have been doing it since the age of eight.  I however do not like patterns, or really following the rules persay. I just sort of make them up as I go along.  That being said, none of my work is extremely professionally finished, but it works.  Plus, I enjoy how things are, and that is all that really matter.  So be forewarned, if you think you can do this better, feel free to.)

Step 1: Measure
Now, I think it is the architect in me that wants to have everything at right angles, and nice and rectangular, but I just measure everything.  I measured the back and one side of the camera, added it together, gave myself a bit of a seam allowance, and decided to cut it there.  Did the same the other side as well.


Step 2: Cut
I took my measurements, and cut it out.  I like to use a rotary cutter.  Love that tool.  When I finally got it, and paid more than I wanted for it, I was so glad I had.  I use it to cut everything!  Also may be because I cut squares mostly, but man, no idea how I lived before.  If you don't have one, get one, you'll thank me.


Step 3: Make two
Now, I was so pleased with myself, got my piece cut out from my extra fabric, live was wonderful.  Then I realized I needed two pieces because I was going to stuff it.  Silly me.  So, don't be like me, make two to start with.  But if not, I just traced over the cut with my rotary cutter, and I was done.  So easy...


Step 4: Sew the sides
I chose to do my thread in red.  For two reasons really.  One, I like contrast.  The red and the purple went well together.  I liked it.  I also don't really care if it matches, I think those who are obsessed with matching thread are sometimes crazy about it. But, the main reason is it was already on the machine and I wasn't in the mood to change it.  Do whatever color you want.  Dye your thread to match you fabric if you really want.


Step 5: Stuff it
I happened to have a bunch of stuffing laying around.  Left over from a huge pillow project I never finished.  And I took some of it, and shoved it in the hole.  Notice I hadn't sewn the one side, so I had plenty of room to stuff.  I made it just poofy enough to be fluffy, but not over sized.


Step 6: Sew the columns
 Now, I had done this before and was super pleased with the results, so I decided to do it again.  Partly because you want the stuffing to stay, partly for looks, sew columns into it.  I made sure they went the way that I was going to fold it over to make the case, but do it however you want.  I just picked a random width, and tried to stay on it.


Step 7: Sew Shut
I found it very handy that the columns worked out so that the last one was about the size of the last pocket.  I then sewed up that last side, and can I tell you, don't know which is which.  It helps with ease that I didn't want to hide the sewing, so I didn't turn it inside out.  I figured I couldn't hide the columns, do why hid the rest.


Step 8: Sew it together
Then you take it and fold it over, and sew the side and bottom.  I did the side first, just so it wouldn't be hard to hold.  The original plan was to have a top flap.  Once again, I planned wrong, but I loved this when it came out anyways.  There are now like two inches of fluff at the top.  I just shove the camera in, and can fold it over, but it stays nice and protected.

I love my camera case now.  It lives in my camera bag, which hopefully I will show you soon.  Do let me know if you decide to make your own, and show me below!  Thanks for checking this out!

27 June 2014

50+ AutoCAD blocks freebie

Hey guys, today I wanted to share with you something that has been terribly helpful to be when designing houses, and those are blocks. 


As many of you know, I love to use AutoCAD to create all my floor plans in.  Have always loved it, and always will.  But it is hard to create a plan from scratch, trust me, I've tried.  So instead I like to use blocks.  They are like little drawings of things that you can put in and don't have to draw them up yourself. 

Here are a few of them for you to take a plan with.  It is super helpful to me, and hope it will be for you.  Linky  Right click and download will probably work the best for you.

02 June 2014

DIY: How to make a Sunglasses Drawer


Yes, I may have a problem.  And no, I do not know how many sunglasses I own.  I lost track around 46.

So, I have been scouring the internet, looking for a way to keep track of my sunglasses.  Most were okay, but for limited amounts.  I needed real space.  I also looked at some professional displays, like store display.  And, although loved them, didn't really have a whole room to devote to it.  Maybe in my next house.  However, I did have a junk drawer in the top of my dresser that held some random items, that I felt could be put to use.  I really wanted to just pull out a table saw and get this thing made out of some nice pine, but alas, I don't have a table saw.  But then I remembered this lovely stuff called Basswood, that comes in these great sized short, yet long stretches, that I have always been able to cut with my exacto.  Heaven.  So, here is my tutorial, on how I made my drawer of sunglasses.


Step 1: Gather Supplies
Here I have my box cutter / exacto / huge cutting tool that slices fingers nicely, my pencil (sharpen), my t-square (simple ruler will work, I just go overboard sometimes), my study solid wood chunk, and my basswood.


Step 2: Make Template
This is the most important step, yes, most important.  You see, my father likes jigs, and whenever he gets a change to make one, he does.  I on the other hand, don't.  But, this little jig was the best thing in the world. It was just a scrap piece from an old project we had laying around. We measured the height of the wood we were going to use, and figured that the hole would be just over half of that. You see, we were going to assemble it with the holes going opposite ways.  Then we figured since the wood would live in the hole, it needed to be the thickness of the wood.  So, we made a hole that was going to be the right size.  It was a bit time consuming, and we did use a saw, but, little bit of heaven, I'm telling you.


Step 3: Grab wood
Gather it.  This may be harder than it looks, I stood at the store for like fifteen minutes trying to figure it out.  Then I got twice as much as I needed.... ah....


Step 4: Cut wood in Half
Easy step, measure height, divide by two, cut in half.  This is where the long t-square came in handy.  Not only is it long, but does everything at a right angle.  Although, I always measure both sides, had too many t-squares not square.


Step 5: Mark for Holes
I then measured how far apart I wanted the holes, just enough to be able for the sunglasses to float nicely.


Step 6: Cut out holes
The little jig and I bonded quite a lot during this step.  Always make sure and line up the hole on the same side of the marking every time or you will end up with a hole out of place.  This was my biggest fear.


Step 7: Tape, if needed
So, I made the long ones full length.  They didn't quite go the length of the drawer, but that extra inch hasn't mattered at all.  However, because I had extra wood for the other direction, I actually taped the left overs together for one slate.  Make sure you don't put all your taped pieces in the same row, stagger them.  Also, if you think it is weak, it isn't once the contraption is together.


Step 8: Assemble
I was very careful with this step, so afraid it wasn't going to work right.  But, it did.  I had done it all perfectly, and all of the weak spots suddenly were solid.  I was amazed actually. 


Step 9: Fill with Sunglasses

I know, impressive looking right?  So many fun sunglasses, yet it isn't all of them.  I've had it up and running for a few months now, and trust me, it doesn't look like this anymore. I have now doubled, and sometimes tripled them up in their little spots.  The nicer ones with cases live in here to.  I have a glasses cleaning cloth, and some liquid cleaning on hand so I can clean them as I put them on and walk out the door.  It has held up pretty good, and I am in love with it, don't think I could ever live without it.  Sometimes the hardest part is choosing which pair to wear, well, and keeping track of them.