

I have decided I want to be healthier. I try a bunch of random things, but most of my working out is at the gym. I don't have $30 - $300 to throw away on equipment I won't use, I have enough of that already. But, when I came across a way to make a kettleball, which is suppose to be super effective, I figured I'd give it a shot. Mine cost me nothing because we already had all the supplies laying around the house, but I am told it isn't that much money to make yourself one. (And yes, I did have a bag of concrete laying around with nothing to do.)

Step 1: Find someone nice and strong to help you. Well, okay, maybe not, but it is more fun with someone else. We took the PVC and put it in the oven on a diagonal and cut it to that length. (Sorry, no pictures)
Step 2: Cook the PVC. Now, I still am not sure this is a good idea, afterall, they wouldn't let us use PVC on the lasercutter because it produced fumes that weren't healthy. So my suggestion is to open a window so you don't die before improving your health by exercise. I don't recall what the temperature was, something hot like you would bake a cake, and I think it was 10 minutes. We were super skeptical of this step, but it worked very well.
Step 3: Bend it. I put my hands on the tube with oven mitts on so we would know where to bend it so I could still grab it nicely. I found it worked lovely with the padding so it isn't tight. You then have to hold it while it cools. This is really where you want two people because we kept switching who held it because it was getting our hands warm.

Step 4: Insert some screws. Now, I know how concrete works, and it is lovely stuff. However, when building walls, you need reinforcement in it, or else the wall may fall down. I was afraid I'd be swinging this ball around and the ball would pop off of the handle. So, to be sure we just popped some screws in the end to grip it. It is also nice to have some nice guy to do this for you. I can do power tools, the drill being one of the easy ones, but I still like my Father's help. I actually use to do this in school too, go to the shop and act all like "oh no, big scary power tool...." looking all cute and helpless. Yep, only had to use the tools half the time because the guys would help. (Most of the time it was two cuts or three nails with the nailgun, I worked on the long projects myself.) But guys like to help and play with the power tools, so I let them.

Anyways, here is the finished screws.
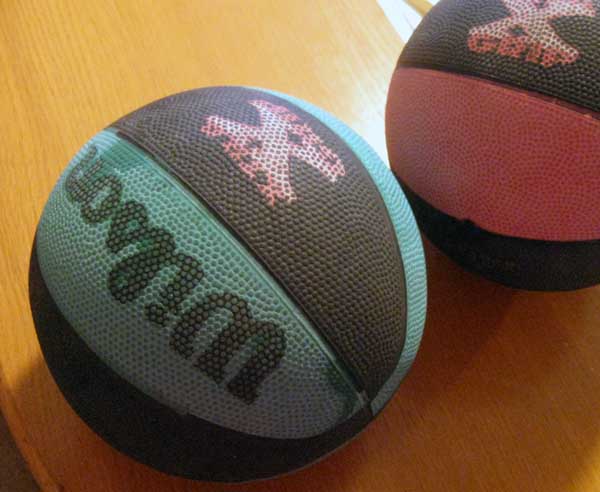
Step 5: Pick a ball. I originally was going to make two, but didn't have enough concrete, or patience. We have had these balls forever, they are the mini basketballs. I loved them to death they were so fun, but they are so old that they will not bounce anymore and really should be thrown away. Alas, perfect for a kettleball!

I happened to be lucky enough to pick the ball that was already flat and sunken in, makes it nice for standing up on the floor.

Step 6: Cut holes. Now, I've seen many versions of this. I choose to combined them. I have the holes for the PVC to go in, did some rough measuring, and kept putting it in to make sure the size was right. I also have a slit down the middle because it was easy to get the concrete in that way. I might have had some fun with this, started out with an exacto, yeah, didn't work well. I mean, it was okay for the first few cuts, but... I eventually just pulled out my, um, sheet metal cutters, and they worked great. Why the sheet metal cutters? Because they were the closest thing when I reached in the drawer. Lots of power in them too.

Step 7: Concrete. Mmmm... concrete... I poured in what I thought I'd need, we ended up having to make a couple of batches, it was fun what can I say.

I really don't know what my obsession with concrete is, but once I added the water, it is just so playful. It somehow gets to the consistency of tasty looking cake batter, and I just always want to eat it. I mean, look at it, so pretty. I made a video of it for you, and even though you may not be able to see it so well, it is so tasty looking. (I might have a problem....)

Step 8: Put the concrete in the ball. Easier said than done, once again, glad I had a friend to help. We had fun and got concrete all over. Lucky for us we emptied the bag so we had a surface, but I recommend some sort of protection for the floor.
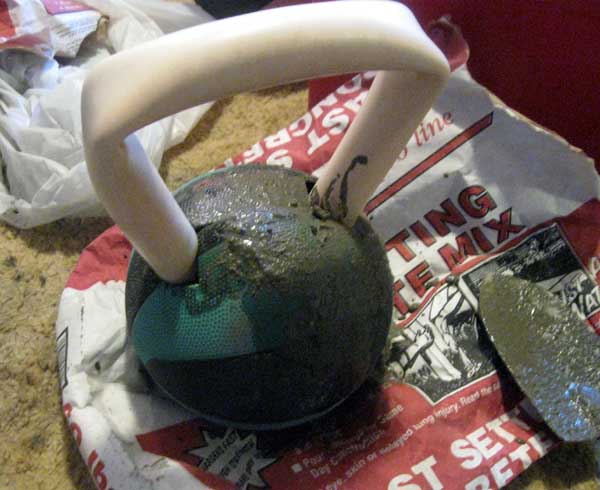
Step 9: Put the handle in, then let it dry. Technically concrete takes 28 days to cure all the way, but it should be solid in this size after a nice nights rest. It claimed to be 10 lbs, but I don't think mine is. I wasn't able to fill it all up, ran out of concrete, but it works well anyways, I think it is about 8 lbs. To make it heavier you could put in some heavy metal, but the only thing we could find was super heavy, and I didn't want it to be 50 lbs.

Step 10: Finishing. I whipped off the dried cement (and yes, it is cement because it is powdery stuff that goes inside concrete, but this was just hanging around on the outside.) I also put a lot of the loose concrete bits inside the pocket of space for extra weight and fun noises when I swing it. I then tapped it up real good so that it didn't come flying out at me. I know what you are thinking, it isn't the prettiest thing in the world, and I will agree. Some people spray paint theirs, but I felt I liked the raw feel of mine.
I hope you enjoyed this, I know I had too much fun making it. Mine now sits on the floor in the basement, around where I work, and every time I go past it I try and pick it up and do a set of 10 - 15 Kettleball Swings. I figure, it might help somehow. Let me know if you make one of your own!
No comments:
Post a Comment
Comments? Questions? Concerns? Emotional Outbursts?